You may have noticed iPhones don't exactly look the same… A lot has changed internally, User Interface (UI) components look far different than they used to.

The code to create these views has evolved, and as a result, so have the UI components themselves.
Swift, Apple's programming language for creating native iOS apps, has used UIKit as its framework for UI components since 2008. Over time, UIKit has evolved into a robust and flexible framework.
In 2019, SwiftUI emerged as a new and faster coding framework to use. However, at the time, developers were not quick to jump on board as SwiftUI was simply not ready. There were no online discussions on using SwiftUI when it first came out, there wasn’t as much documentation, and it still needed time for more UI components to come in. 5 years later, this is not quite the case anymore.
As Apple plans for SwiftUI to slowly mature and overtake UIKit as the primary framework for iOS Apps, new native components will only continue to evolve. As a result, UI components in iOS devices and the iOS user experience will evolve too.
In this blog, we will explore the benefits of making the transition from UIKit to SwiftUI to code views in your project, while also keeping in mind the limitations and pain points you may run into
Benefits of SwiftUI vs UIKit - A quick practical demo
The benefits SwiftUI offers us largely come from its easy-to-read and code, declarative syntax. Rather than explaining how it's different from UIKit, I think it might be easier to just show you.
Contacts List App Example
Below I have created two simple apps showing a contacts list, one in UIKit and one in SwiftUI.

UIKit - Difficult to understand
As you can see below (figure 3), writing in UIKit can be nuanced and difficult to understand to the untrained eye.
For this app in UIKit, I had to create both a Storyboard (a place where I can drag and drop objects to create a view) and a viewController to control the data. This is two files and 63 lines.

SwiftUI - Easy to understand and intuitive to write
SwiftUI in comparison is far easier to write and read, even to an untrained eye. It only required one file, containing 41 lines. I was able to show the code below to a friend without any coding knowledge, and they were able to understand how the app shown on the right was made through the code on the left.
There is a List, separated by two sections, each containing the names of either contacts or fav contacts.
Another benefit shown below is SwiftUI Live Previews. You can get a live interactive preview of the view which will change in real-time with any edits you make. This is better than UIKit where you would have to run your program on a simulator every time to see your changes.

Summary of benefits
The declarative syntax for views is much easier to write and understand
Reduces the amount of code you have to write to create views
Removing older views and legacy code
We are keeping up to date with the latest UI components available
SwiftUI Live Previews
Challenges and considerations
Challenge 1: SwiftUI being the Newcomer
SwiftUI hasn’t been around as long as UIKit so there are still some components that may not be as robust or malleable. UIKit is relatively more stable and has more UI components available than SwiftUI. There is also much more online support [1] and documentation for UIKit.
SwiftUI has now been around for 5 years, which is enough time for good documentation to be put through, and all the initial bugs to be dealt with. Also, I believe it is a fair tradeoff, the majority of components are now available and newer ones with more functionality have been put in
You can think of SwiftUI as an automatic car, and UIKit as a manual car. You have more control over UIKit however it may take quite a bit more learning time to get the hang of.
SwiftUI being the automatic car handles a lot of nuances that we would have to worry about earlier. In the example used earlier, we used to dequeue cells in tableViews manually (figure 3 - line 51). This is to reuse cells which reduces new cell objects being created, which means we are using less memory and the table has a better performance when scrolling down a huge table. In figure 4 we use List where we don’t have to worry about that at all! A great improvement in SwiftUI is that Lists reuse cells automatically, unlike tableViews in UIKit.
If there are some limitations with SwiftUI that only UIKit can solve, the good news is that we can integrate UIKit and SwiftUI views in our projects alongside each other. This leads us to our next challenge…
Challenge 2: Integrating SwiftUI Views in an existing project
Making this transition isn’t as easy as dumping your project and creating a new one. It is a slow and gradual change where there should be quite a bit of overlap.
The key to this is to manage your architecture well, to make sure the new code is neatly arranged in new folders or modules, while also marking old code and files that you plan on removing. In our Kogan iOS project, we created several modules, which created a better separation of concerns, improved testability, and was able to make each module more reliable and robust.
SwiftUI is simply a framework to create views, a lot of the remaining code such as in coordinators to help navigation or viewModels to help with data to feed into views, can still be used from your previous code.
Navigation in a SwiftUI app is a bit different from a UIKit app. In SwiftUI you simply wrap your views in a NavigationView, and can use NavigationLinks to take you to another view (reference [5] explains this wonderfully). However, for those of you who are transitioning from UIKit, this shouldn't concern you.
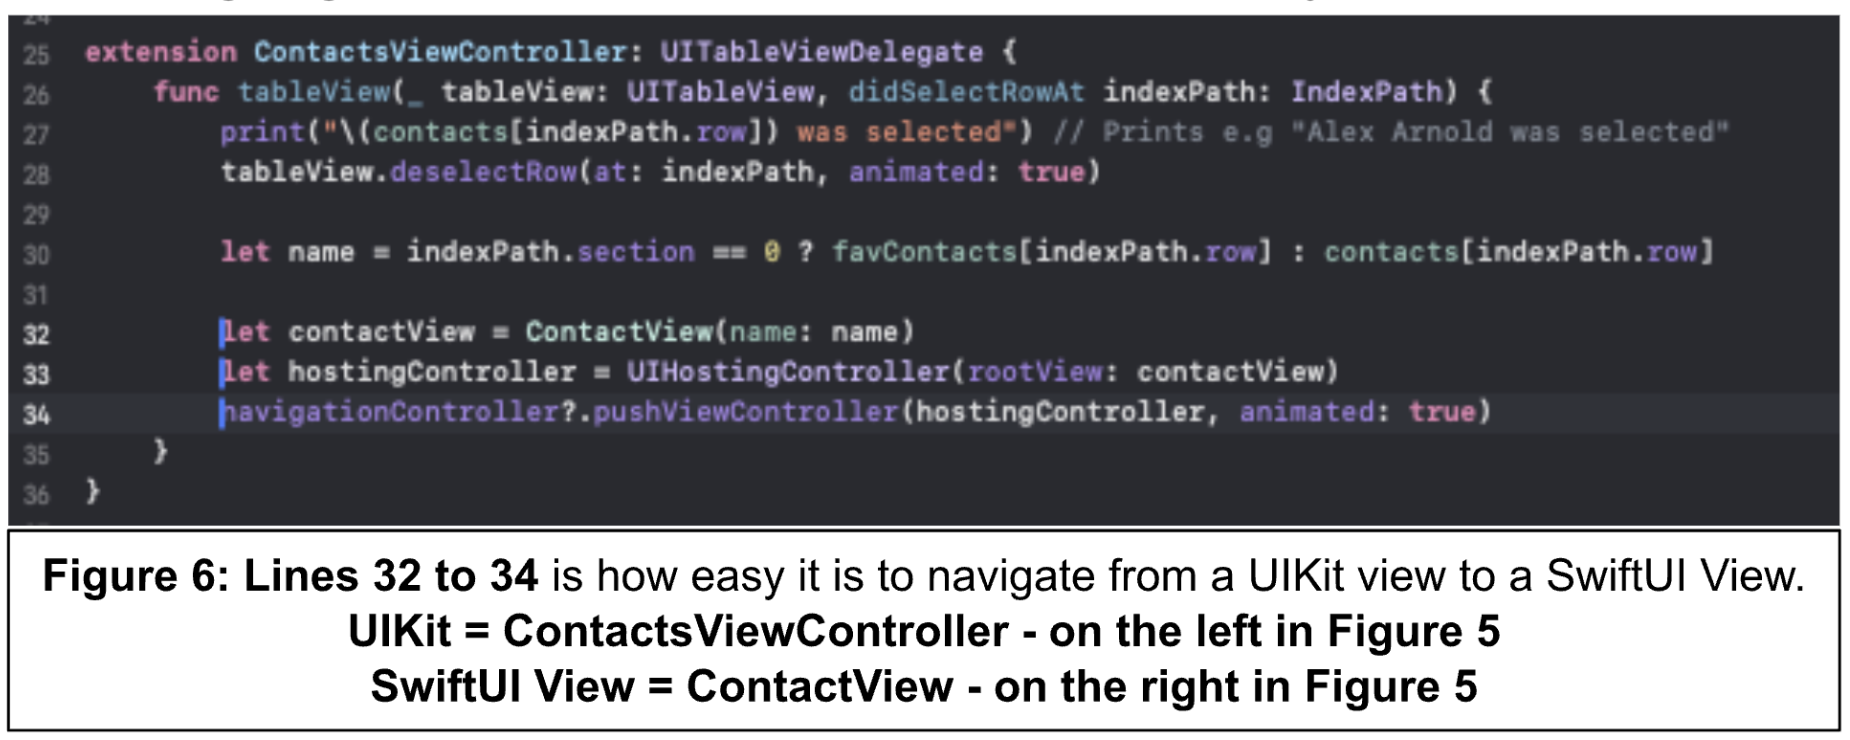
In UIKit you have to create navigationControllers to manage which viewControllers are being used and navigated around. If you are transitioning, you can continue using navigationControllers as you do in UIKit, for your SwiftUI views. You simply need to wrap your SwiftUI view in a UIHostingController (see Figure 6).
Another myth I’ve seen online is that it is difficult to have SwiftUI Views in a predominantly UIKit-led project. This is not true at all, its super easy to do, you can even have fail-safes to return to showing your old UIKit Views. Take a look at the next page!

Navigating from a UIKit view to a SwiftUI view was as easy as the code below.
At Kogan, we were very cautious during our transition. One of the ways we did this was by utilising Feature Flags, so that when turned on, the new SwiftUI view will display, and when turned off, the old UIKit view will display. This can be done in conjunction with Firebase Remote Config, so that you can instantly switch what view users see, instead of having to make a patch release if something goes wrong.
Conclusion
SwiftUI is ready for any team pondering the jump. It’s a great opportunity to clean your project. You will slowly be removing legacy code while introducing the latest bits of UI to your App. Once you have made the initial hurdle of replacing your views with SwiftUI, the development will be much faster, and the code will be much easier to understand!
The key technical issue that you will face when going from UIKit to SwiftUI is using a framework that hasn’t had its time to mature compared to UIKit. I believe that 5 years have been enough, and SwiftUI components can offer us faster coding with how easy it is to declare views but also automatically handle previous pain points such as dequeuing cells in a tableView.
Another key technical issue is creating a hybrid application while we transition. This can be slow, but it is possible to manage and work around it as we have done here at Kogan, and you will only get faster.

References
SwiftUI vs. UIKit: What is the best choice for building an iOS user interface in 2024? https://sendbird.com/developer/tutorials/swiftui-vs-uikit
Evolution of the programming languages from iPhone OS 1.0 to iOS 14 https://blog.timac.org/2020/1019-evolution-of-the-programming-languages-from-iphone-os-to-ios-14/
Why do we use dequeueReusableCellWithIdentifier ://medium.com/ios-seminar/why-we-use-dequeuereusablecellwithidentifier-ce7fd97cde8e
SwiftUI: Navigating Between Screens https://medium.com/@TechSavvyScribe/swiftui-navigating-between-screens-895be6908c59#:~:text=The%20primary%20way%20to%20navigate,the%20NavigationView%20and%20NavigationLink%20views.&text=In%20this%20code%2C%20NavigationView%20is,a%20link%20between%20two%20views.
The basics of working with declarative programming languages https://www.techtarget.com/searchapparchitecture/tip/The-basics-of-working-with-declarative-programming-languages
